
What is Azure Information Protection and how does work?
- ALIF Consulting

- Apr 11, 2021
- 9 min read
Updated: May 23, 2024
Microsoft’s Azure Information Protection is a cloud solution (referred to as AIP) that gives an organization the power to classify and protect documents, data, and emails with labels. AIP client helps to keep important documents and emails safe from unauthorized parties who shouldn't see them, even if the email is forwarded or documents are saved to another location. The AIP solution is used to classify documents and open documents that other people have protected by using the “Rights Management Protection” technology from Azure.
Classifications and policies are defined at the organization level and are enforced by AIP clients. The client checks for any changes whenever a supported Microsoft Office application starts and downloads the changes as per its latest Azure Information Protection policy. Users must have Azure Information Protection clients installed on their machines to define classifications and open protected documents.
Under Microsoft’s Azure Rights Management, documents can be protected even when not in the organization's system. A file can be set to be viewable only to specific individuals, even if the file is taken out of the system and distributed elsewhere, thereby keeping the data protected and encrypted even if the document is copied or removed.
In this implementation guide, we cover the following four phases of the Information Protection life cycle and provide guidance on how to approach each of these phases.

How does Azure Information Protection work?
Azure Information Protection is a data protection service from Azure Information Protection does not see or store your data as part of the protection process. Information that you protect is never sent to or stored in Azure unless you explicitly store it in Azure or use another cloud service that stores it in Azure. Azure RMS simply makes the data in a document unreadable to anyone other than authorized users and services.
At a high level, Azure Information Protection protects your data in three key steps
First, data is classified and labelled. For example, if a document is classified as confidential and should be available only to the recipients of the email, the label might be “Confidential — Recipients Only.”
Next, data is protected through encryption, access control, and policies based on the label. Continuing with the preceding example, a document marked with the Confidential — Recipients Only label will be encrypted so that only the recipients can read it.
Finally, documents can be tracked, and access can be revoked if necessary. From the preceding example, the sender of the email may decide that one of the recipients should no longer have access to the document. In that case, the sender can revoke access for a specific user.
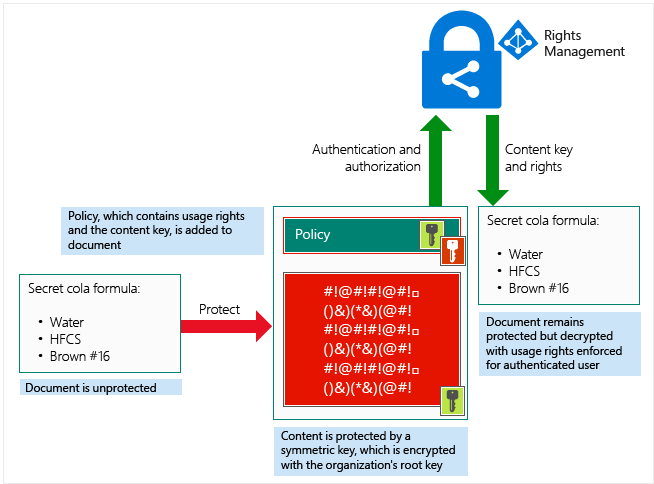
At a high level, A document containing the secret formula is protected and then successfully opened by an authorized user or service. The document is protected by a content key (the green key in this picture). It is unique for each document and is placed in the file header, which is protected by your Azure Information Protection tenant root key (the red key in this picture). Your tenant key can be generated and managed by Microsoft, or you can generate and manage your own tenant key.
Throughout the protection process, when Azure RMS is encrypting, decrypting, authorizing, and enforcing restrictions, the secret formula is never sent to Azure.
Office 365 Message Encryption, or OME, is one of the features of Azure Information Protection. If you have the AIP Premium P2 license, you can avail yourself of additional functionalities, such as automatic classification for cloud and on-premises data. Here, you discover the features available in the AIP Premium P1 license.
What can be achieved by Azure Information Protection?
Azure Information Protection is a cloud-based solution that helps an organization classify and optionally protect its documents and emails by applying labels. Labels can be applied automatically by administrators who define rules and conditions, manually by users, or in combination with a combination of the two, where users are given recommendations.
A number of technologies are behind Azure Information Protection, and the classification is achieved through the use of labels, which are now unified across Office 365.
Applying protection is achieved either by applying a label that has protection or by a user choosing to protect certain data.
As an example, a user can choose to protect an email by clicking the “Do Not Forward” option.

The result is that for the email recipients:
Copy and paste is disabled on Protected content
Screenshots do not work
Screen sharing will result in black, where the application window will be
Printing is disabled
The forward button does nothing
When replying, you cannot add new recipients to the replies
This kind of protection can be achieved because encryption technology is embedded in Office applications. It is not, like a password-protected Zip file, a wrapper around the files. The actual content is protected. Office files such as Word, Excel, and PowerPoint can all be protected using AIP.
What are the requirements for Azure Information Protection?
1) Licensing Requirements :
· Standalone
· As part of an Enterprise Mobility + Security (EMS) suite
· As part of a Microsoft 365 Enterprise E3 license.
You will also need an Office application version that supports the Azure Information Protection features, and that means either:
· Office 365 Enterprise E3; or
· Office 365 Enterprise E5.

2) Azure Active Directory
Your organization must have an Azure Active Directory (Azure AD) to support user authentication and authorization for Azure Information Protection. Configuring Single Sign-On (SSO) for Azure AD is also highly recommended for a seamless user experience. Additional details on requirements for Azure AD can be found in our documentation.
3) Network Connectivity
A common stumbling block for many AIP deployments is the Firewall and Network Requirements. Azure Information Protection uses a subset of the Office 365 URLs and IP address ranges. We recommend following the guidance in the Office 365 documentation and opening all Required URLs and IP addresses listed under the Microsoft 365 Common and Office Online12 section. One additional callout is that termination of TLS client-to-service connections (for example, packet-level inspection) to the aadrm.com URL will break the certificate pinning required by AIP to ensure secure communications with the Microsoft Root Certificate Authority.
For those consuming content
If you are an external recipient, you would need a suitable email address:
· Users of Hotmail, Yahoo, or Gmail will be able to log in using those accounts and access content
· If the recipient or their company uses Office 365, their email address will be supported without further action
· If they use other email addresses (e.g. email provided by their company but not through Office 365), they will need to sign up for an account at https://aka.ms/rms-signup
Using a Windows PC
One of the following versions of Microsoft Office:
· Office 2013 or later (all editions)
· Office 365 ProPlus applications (as included in Office 365 E3, for example)
· Office 365 Business applications (as included in Office 365 Business Premium, for example)
· Excel Online (supported, but we expect most people will want to use our data in the full desktop applications)
· Office 365 Home and Personal
The recipient or their IT department may have already installed the Azure Information Protection Client, but this is no longer essential for consuming content.
Using macOS
You will need one of the following versions of Office:
· Office 365 ProPlus: Office 2016
· Office Standard 2016 for Mac
Using an Android device or an Apple iOS device
With Office Mobile or Outlook installed, users should be able to open protected documents without trouble.
Using web applications
Support for the consumption and protection of content using web apps is rolling out across tenants, and some features are still being developed.
How to install Azure Information Protection Client?
You can have the greatest policies and labels for Azure Information Protection in Azure, but they’ll be no good if your end-users can’t see and apply them. The AIP client, a program that is run on the end users’ devices, solves this problem.
Before you install the AIP client, make sure Office ProPlus is already installed but not running on the device. When you’re ready to install the AIP client, do the following:
1. Navigate to the Azure Information Protection client download page.
The Microsoft Download Center appears.
2. Click the Download button.
The Choose the Download You Want window is displayed.
3. Select AzInfoProtection.exe by selecting the box and then click Next.

Downloading the Azure Information Protection client.
1. From the notification that pops up at the bottom of your screen, click (or double-click) Run.
The system performs a security check on the download. When the check is complete, the Microsoft Azure Information Protection window pops up.

Installation window for Azure Information Protection
1. Click the I Agree button.
You can opt to install a demo policy (not recommended because it will clutter your user interface) or send usage statistics to Microsoft or both.
2. In the User Account Control window that displays, click Yes to start the installation.
You see the progress of the installation.
3. When the Microsoft Azure Information Protection window displays Completed Successfully, click the Close button.
The installation window disappears, and you’re now ready to check that the Azure Information Protection client was successfully installed. To verify the installation, open a blank document in Word. You see the labels below the ribbon.

Azure Information Protection labels displayed in Word.
How do you apply a Label to a Document?
Now that the Azure Information Protection client is installed and the labels are displayed in the Office applications, it’s time to put it to the test.
1. Create a Word document and pretend that it’s highly confidential.
2. On the Sensitivity bar, click Highly Confidential and select All Employees.

Applying the Highly Confidential/All Employees label
The label is applied, and the other labels will disappear.
1. Run Outlook, start a new email and attach the Word document.
Note that Outlook displays the Sensitivity bar with the same labels you saw in Word.
2. Enter the email address of a user in your organization.
Outlook sends the email to the recipients with the Highly Confidential/All Employees label. In this exercise, the email will still go out to both internal and external users. The internal user will be able to open and read the document from the sharing invitation.
The external user, however, will be blocked from opening the document and will be presented with the message shown here.

An external user is blocked from a sensitive document.
What are labels in Azure Information Protection?
The following is a list of classifications that were defined for CRIF Highmark. Depending on Celcom’s security requirements, data classification was defined as shown below.
Public: The lowest level of data classification that applies to any of the official documents or emails. Users can select the “External” label if the document or email doesn’t belong to Internal or Restricted.
Proprietor: Internal classification applies for the documents and emails if the information should only be shared within the “celcom.com.my” and “axiata.com” domains.
Company Confidential: The highest level of classification that applies to highly confidential corporate information. This classification can be applied to emails or documents if they contain the organization’s sensitive information.
How to create a new Label in Azure Information Protection?
Open a new browser window and sign in to Protection.office.com. Then, navigate to the Azure Information Protection pane.

Revoking access to information in Azure Information Protection
Revoking access to information
Azure Information Protection protects your company information from falling into the wrong hands — even after it has fallen into the wrong hands.
For example, suppose you realize that you accidentally sent a document to the wrong people and want to remedy the situation by revoking all access to the document. Here’s what you can do, continuing from the example above:
1. Open the protected Word document from the preceding exercise.
A yellow bar appears, indicating the sensitivity of the document, and a button is inserted to view the permissions for the document.
2. On the Ribbon, click Home and then click the Protect button.
A submenu appears below the Protect button.

Accessing the document-tracking site
3. On the submenu, click Track and Revoke to launch the document-tracking site.
Your browser launches to take you to the document-tracking site.
4. If this is the first time you’ve visited the site, log in with your Microsoft 365 Business credentials.
After a successful login, the document-tracking site displays a summary of views of your document. Explore the tabs to see the robust features of Azure Information Protection.

The document-tracking site
5. At the bottom of the document-tracking site, click the Revoke Access button.
The Revoke access page is displayed.
6. Click the Confirm button at the bottom of the page.
The Revoke Complete window is displayed.
7. Click Continue to go back to the document-tracking page.
In the Summary view, the document displays the Revoked stamp.
One of the most amazing features of this solution is that in the Map tab, you can see where around the world people have tried to access your document! So, if you ever find that someone from, say, Russia or Timbuktu tried to open your document even though all your users are in the United States, you’ll know that access to the document should be revoked.
Is AIP free?
AIP can come with certain plans for M365 licenses to be incorporated. AIP can also be purchased separately as an add-on with a Basic M365 license.
Refer to the below image for more clarity.


